 Shared Web Hosting
Simple, secure, and reliable cloud hosting
Shared Web Hosting
Simple, secure, and reliable cloud hosting
 Semi-Dedicated Cloud Hosting
Higher power & more resources
Semi-Dedicated Cloud Hosting
Higher power & more resources
 Reseller Cloud Web Hosting
White label & fully customizable
Reseller Cloud Web Hosting
White label & fully customizable
$2.24/mo
GET STARTED NOW
- HOME
-
All Products
- Cloud Web Hosting
- Web Hosting
- Reseller Hosting
- Semi-Dedicated Cloud Hosting
- Cloud Compute
- Virtual Private Servers
- Other Services
- SSL Certificates
- Specials
- Company
Posted By: Tony Baird
Last Updated: Tuesday September 24, 2013
Laravel is an increasingly popular PHP framework which means we have customers inquiring how do they go about installing it on their hosting. I’m going to go through how to install Laravel on our servers on the primary domain of the account. You could also using this tutorial install it within an add-on domain or sub domain with just a few modifications.
We’re going to do the entire installation from SSH which means you’ll need a SSH client. I would recommend using Putty if you’re running Windows you do not already have a SSH client. Once you have your SSH client ready it’s time to start the installation process.
By default our servers do not have the PHAR extension enabled. You will need to enable it from your cPanel. Login to your cPanel then go to “Select PHP Version”
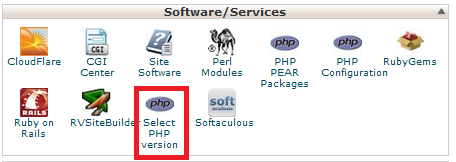
Once you are on this page you will see a list of extensions. You will need to be on PHP 5.3, 5.4 or 5.5 and check off PHAR and click save:

Congratulations we now have Phar enabled on our account. We can now install composer on our account.
Composer is a tool for dependency management in PHP. We are going to use this to install Laravel on our account. At this point we will now want to login to SSH of our hosting account. Once you are logged in you will want to run the following command
curl -sS https://getcomposer.org/installer | php
Composer should now be installed at /home/yourusername/composer.phar . We however want to be able to just run composer rather than specifying where composer.phar is. We can do that by doing the following:
echo "alias composer='/usr/local/bin/php ~/composer.phar'" >> .bashrc . ~/.bashrc
. ~/.bashrc
What this does is add an alias for composer and then reloads your .bashrc file so it’s available immediately.
We now are finally going to install the laravel package. We can do this by running the following from SSH:
composer create-project laravel/laravel myproject --prefer-dist
Laravel should now be installed in the folder myproject and there is just one more step to make the the project compatible with our hosting. You will now need to make so the public folder of laravel is in fact your public_html folder.
mv public_html public_html_backup
ln -s /home/username/myproject/public /home/username/public_html
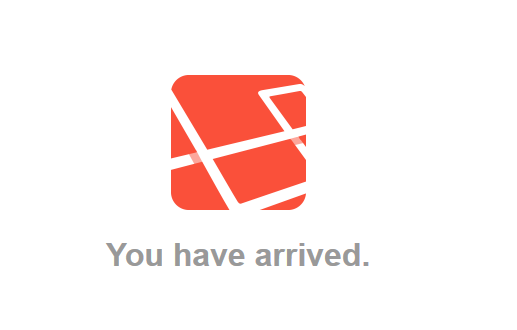
Make sure to replace username with your account’s username. You have now successfully installed laravel and if you view http://yourdomain.com/ you will be greeted with
If you ever want to have your old public_html folder back you would have to run the following from your home folder:
rm public_html
mv public_html_backup public_html
I think that covers everything you need to get your laravel project started. You will be able to modify files in your myproject folder. You can use composer to add additional dependencies to your laravel project. You can also use Laravel’s artisan CLI to assist with the development of your application.
